DIY: REFACING A WALL PRESENTED BY 901 FLOORS

BEFORE YOU START
Products can be installed over: drywall, plywood, cement board.
Note: All substrates should be sound, clean, dry, smooth, and flat.
Do not install over greasy/oily surfaces, loose paint, or other debris. For standard installations of hardwood on walls, the product can be installed horizontally, vertically, and as a wainscoting. For best results, layout the planks/strips on the floor prior to installing on wall to determine the desired visual.
TOOLS & MATERIALS
- Flooring
- Stud Finder
- Tape Measure
- Caulk gun
- Air Compressor
- Nail Gun (Brad Nails)
- Jig Saw
- Table Saw
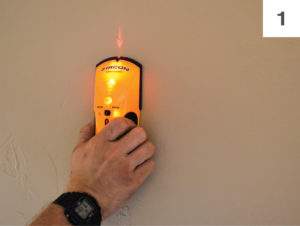 STEP 1: LOCATE WALL STUDS
Use a stud finder to find wall studs, and use a pencil to mark the locations of the studs. Using a tape measure, measure (a) the distance from the floor to ceiling and (b) the length of the wall. These measurements should be used to determine both the amount of hardwood needed for wall installation, and the spacing of the first and last row of horizontal installation. Arrange the hardwood planks/strips on the floor to see the desired visuals and patterns.
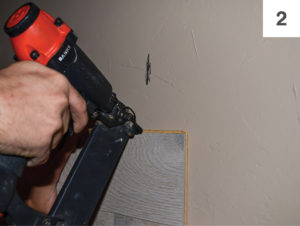 STEP 2: PLACE THE FIRST PLANk/STRIP
Connect the brad nailer to the air compressor and turn it on. Use 1-1/2” to 2” long brads. Place plank on the wall so that the side tongue of the plank is facing up. Face nail (where the nail will be seen) on the plank in an area where the wall base trim will cover the plank. Also blind nail (so the nail will not be seen) through the tongue of the plank. Place the second plank on the wall such that the end of the plank tongue can be engaged into the groove end of the first plank installed. Then brad nail the second plank in the same manner as initial plank. Repeat to finish the first row.
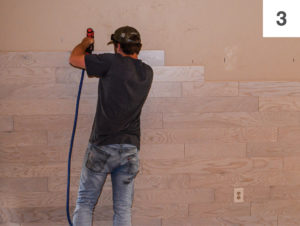
STEP 3: ENGAGE ROW OF PLANK/STRIPS
Engage the initial plank of the second row into the adjacent plank(s) of the first row. Do not face nail second row or subsequent rows. Instead, only blind nail into the side tongue. Engage the tongue into the groove (with accompanying blind nailing) and continue installing planks on the wall.
Pro Tip: After completing the first row, use a cut plank from the first row (if longer than 6”) for the start of the second row.
ACCOUNTING FOR OUTLETS & SWITCHES
If there are either outlets or switches on the wall, a jig saw or coping saw can be used to cut the hardwood flooring to allow the proper fit of the outlets or switches.
First, remove the outlet covers so you can cut the hardwood planks to fit around them. Then, reinstall the faceplate over the hardwood flooring.
Pro Tip: When fitting around obstacles or into irregular spaces, planks can be cut easily and cleaned using a utility knife with a sharp blade. It is often beneficial to make a cardboard template of the area and transfer this pattern to the plank.
Protect all exposed edges of the flooring by installing quarter round. Make sure no plank will be secured in any way to the subfloor.
*Materials provided by 901 FLOORS
626 W. Poplar Ave, Collierville, TN 38017
(901) 457-7370 / 901floors.com