
DIY: Installing New Floors
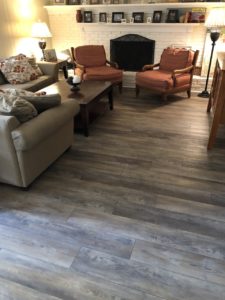
PRESENTED BY 901 FLOORS
MATERIALS
• SHAW LVT (LUXURY VINYL TILE) FLOORING
• QUARTER ROUND
• T-MOLD
• THRESHOLDS
• RUBBER MALLET
• TAPPING BLOCK
• CROWBAR
• TABLE SAW
• UTILITY KNIFE/RAZOR KNIFE
*Depending on the existing flooring, not all tools will be needed.
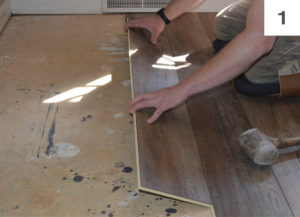 STEP 1: Laying the First Plank
Installation of the product must start from the left side of the room, working to the right when working in front of the planks or facing the starting wall.
Install the second plank in the row by aligning and dropping the end tongue over the end groove of the first plank. Apply light pressure to join the two planks together.
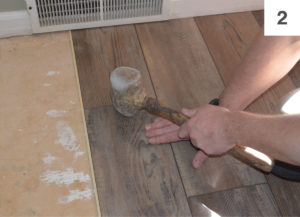
If needed, use a rubber mallet to fully engage the short side of the plank by lightly tapping the plank to engage and sit flush with the adjacent plank. Maintain an expansion gap of approximately 1/4” from the wall. Repeat this process to complete the first row.
Pro Tip: Before you start the installation, determine the layout of the flooring. As with all plank products, you should install the planks parallel to the longest exterior wall.
 STEP 2: Installing the Second Row
Start the second row by cutting a plank to the desired length. Keep in mind that the plank must not be shorter than 6” (15 cm) to achieve the best appearance.
Install the first plank in the second row by inserting the long side tongue into the groove of the plank in the first row. This is best done with a low angle of the plank. Maintain light pressure into the side seam as you rotate the plank to the subfloor. Repeat the process with additional planks to complete each row. Very little force is required to seat the tongue into the groove.
Pro Tip: When fitting around obstacles or into irregular spaces, planks can be cut easily and cleaned using a utility knife with a sharp blade. It is often beneficial to make a cardboard template of the area and transfer this pattern to the plank.
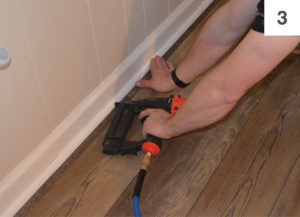
Protect all exposed edges of the flooring by installing quarter round. Make sure no plank will be secured in any way to the subfloor.
 STEP 3: Be Mindful of Gapping
Continue installing planks and make sure to achieve a random appearance with end pieces of minimum 6” (15 cm). Check that all planks are fully engaged; If a slight gapping is found, the gap can be tapped together by using a tapping block in order to avoid damages on the planks.
*Materials provided by 901 FLOORS